
# Configuration Options
# Access
# On-Screen Navigation
Enable or disable the 4-way navigation tool. Remember - you can reposition this just by dragging it - and resize it by pressing and holding on the tool - then dragging one of the corners. Have a watch of this video to see how it works.
# Access Mode
There are currently three options;
- 1 switch - Auto-Scan
- 2+ switches
- Wheel (NB: Experimental!)
# Switch Setup - Background
Switch access works by mapping keyboard keys to different actions. A box which allows one or several switches to be plugged in and then connect to the device is then needed. Be aware that for pasco we are looking at switch boxes that support keyboard presses without any additional software. Some (such as the JoyCable and the Crick USB switch box) emulate a joystick button which won't work. Also switch boxes such as the Hook+ won't work either unless you follow our guide on how to use iOS switch scanning with pasco. The following currently work with pasco on iOS:
# 2+ Switches (Default)
By default switch access is set to Manual - which would allow someone to use the on-screen navigation tool - or use 4 switches to navigate the currently active language tree. For example the arrow keys - up, down, left & right - would allow someone to access the tree. Equally, the keys a (left), s (down), d (right), w (up) can be used. Lastly the keys 1 and 2 would allow a user to go left and right in the tree.
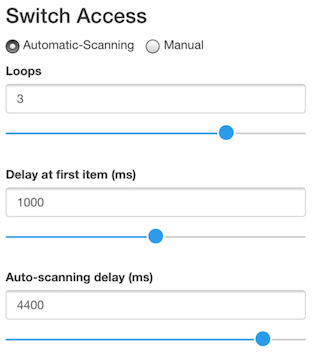
# 1 switch - Auto-Scan
Automatic scanning, often called "1 switch scanning" allows a user with one switch to navigate pasco. The computer moves through each item so the user doesn't have to - and only selects the one they want when ready.
Be aware - you need to select which switch key selects (moves forward) - which you can do in the option "Switch key to select items". There are then some options you can configure:
# Loops (Default: 3)
The number of times the automatic scan runs through each level of the tree before stopping.
# Delay at first item (ms) (Default: 1000 ms)
It is sometimes useful to have a delay at the first item in each level of the branch to help someone to time their switch press.
# Auto-scanning delay (ms) (Default: 3000 ms)
The time the scanner moves from one item to a next automatically. Want it to scan quicker/faster? Move it down. Want it to scan slower? Move it up.
# Configure Actions
# Switch key to select items
Here you can choose your switches (keys) and what should do what action. Select the action (e.g. in Automatic/1-switch scanning you will need to just select the "Select item" action). Then add your key. Remove any keypresses that you don't want to be used by pressing the red cross.
# Minimum Cue Time (ms) (Default: 0 ms)
By turning this on it stops the user selecting a large number of items in the tree before hearing the cue. You can change the default time here.
TIP
You probably want to keep it under 500ms other wise it can feel laggy
# Ignore second hits (ms) (Default: 100 ms)
This feature stops the switches being responded to if they are hit within this timeframe. So for example, if a user presses a switch and hits immediately afterwards - pasco will ignore this second press if it is within the timeframe. Some
# Helpers
We will add additional 'helpers' (actions that alter the tree) here - but for now we only have one helper:
# Back option for all branches
It's really useful for single switch scanners to get back a branch if they need to. This adds the option of 'Back' to the end of each Branch, at the beginning of each branch or not at all.
# Speech
# Cue Voice
The cue voice - often called the private voice is the synthesised voice that is designed for the communication user to hear. Ideally this would be to a headphone or quiet speaker that only the communication aid user can hear.
Choose your voice and the related volume, pitch and rate (speed) of the voice as you wish. Note there is a plus symbol - this allows people who are using more than one language to add a different synthesised voice for that language. Note there is a line on each slider. This defines the default position so you can reset it if you ever slide this by accident.
# Main Voice
The main voice - often called the public voice is the synthesised voice that is designed for the communication partner(s) to hear. This is often an amplified speaker.
Choose your voice and the related volume, pitch and rate (speed) of the voice as you wish. Note there is a plus symbol - this allows people who are using more than one language to add a different synthesised voice for that language.
# First time run (Cue Voice)
For many people who are visually impaired its useful to 'hear' the items at each selected branch. This is like someone who is using their eyes to visually scan the interface. It give the user a fast way of scanning the items. If you turn this on we recommend making as fast as you can before the voice becomes hard to understand.
TIP
This won't increase the speed of any recorded messages. Note: This option is only available for automatic scanning.
# Appearance
This area defines how the application looks and feels.
# Font size
Adjust the font size of the text shown in pasco
# Theme
There are a number of themes - some designed for people with a visual impairment - to aid easier reading of the text
# Locale
To change the language of the app (the menus and the configuration text) you can change it here.
TIP
This doesn't automatically change the language of the trees/vocabulary. For that you will have to use something like google translate.
# Vocabulary
# Active Tree
Allows a user to switch the current active Tree. This means you could have one tree for social chat, another with spelling and another for a particular school or workplace. But more importantly it allows you to switch between a English only tree and a foreign language tree. More information, including how a user can switch without going into the configuration screen can be read here.
# Tools
# Load an example tree
Pasco has some example vocabularies installed which you can load up. Select the tree, Press "load selected"", then "Save Tree".
# Export / Import
Here you can export or import your vocabulary file as a zip file - or a OBF file - to be used in different AAC programmes.
# Edit Tree
Because you can have different "Trees" (Vocabularies) in pasco - you need to choose which tree you are working on, edit the tree - and then Save it when you are ready. If you want to make a new Tree - press new. More information on editing the trees can be found here